Automating Shape Layout and Formatting in PowerPoint with Python

Share office file processing skills in .NET, Java, and C++.

In PowerPoint presentations, shapes are fundamental elements for building visual content. By combining multiple shapes together, you can create complex graphical objects; by applying 3D effects and shadows, you can make shapes more vivid and professional. This article demonstrates how to use Python to combine, ungroup, and apply various visual effects to shapes in PowerPoint.
Why Shape Combination and Formatting Matter
When working with PowerPoint presentations, advanced shape operations offer several advantages:
Unified Management: Once multiple shapes are grouped, they can be moved, resized, or copied as a single unit
Visual Enhancement: 3D effects and shadows can elevate the professionalism and appeal of your presentation
Batch Operations: When formatting changes are applied to grouped shapes, all child shapes update synchronously
Template Creation: Programmatically generate standardized presentation templates containing complex graphics
These capabilities are particularly valuable for creating flowcharts, organizational charts, infographics, and other complex visual content.
Environment Setup
First, install the Spire.Presentation for Python library:
pip install Spire.Presentation
This library provides a comprehensive PowerPoint manipulation API that supports shape creation, formatting, grouping, and special effects processing.
Basic Implementation: Grouping Multiple Shapes
Shape grouping is the operation of merging multiple independent shape objects into a single logical unit. The following example demonstrates how to create two shapes and group them together:
from spire.presentation import *

# Create a presentation instance
ppt = Presentation()

# Get the first slide
slide = ppt.Slides[0]

# Set background image
rect = RectangleF.FromLTRB(0, 0, ppt.SlideSize.Size.Width, ppt.SlideSize.Size.Height)
slide.Shapes.AppendEmbedImageByPath(ShapeType.Rectangle, "bg.png", rect)
slide.Shapes[0].Line.FillFormat.SolidFillColor.Color = Color.get_FloralWhite()

# Create the first shape - Rectangle
rectangle = slide.Shapes.AppendShape(
    ShapeType.Rectangle,
    RectangleF.FromLTRB(250, 180, 450, 220))
rectangle.Fill.FillType = FillFormatType.Solid
rectangle.Fill.SolidColor.KnownColor = KnownColors.SkyBlue
rectangle.Line.Width = 0.1

# Create the second shape - Ribbon
ribbon = slide.Shapes.AppendShape(
    ShapeType.Ribbon2,
    RectangleF.FromLTRB(290, 155, 410, 235))
ribbon.Fill.FillType = FillFormatType.Solid
ribbon.Fill.SolidColor.KnownColor = KnownColors.LightPink
ribbon.Line.Width = 0.1

# Add both shapes to a list
arr = []
arr.append(rectangle)
arr.append(ribbon)

# Group the shapes
ppt.Slides[0].GroupShapes(arr)

# Save the document
ppt.SaveToFile("GroupShapes_out.pptx", FileFormat.Pptx2013)
ppt.Dispose()
Result Preview:

Key points to note:
Use the
AppendShapemethod to create different types of shapesAdd the shapes you want to group into a list
Call the
GroupShapesmethod and pass the shape list to complete the groupingGrouped shapes can be manipulated as a single entity
Applying 3D Effects to Shapes
3D effects can give flat shapes a three-dimensional appearance, enhancing visual impact. The following example shows how to add different 3D effects to shapes:
from spire.presentation import *

# Create a presentation
ppt = Presentation()

# Set background
rect = RectangleF.FromLTRB(0, 0, ppt.SlideSize.Size.Width, ppt.SlideSize.Size.Height)
ppt.Slides[0].Shapes.AppendEmbedImageByPath(ShapeType.Rectangle, "bg.png", rect)
ppt.Slides[0].Shapes[0].Line.FillFormat.SolidFillColor.Color = Color.get_FloralWhite()

# Add the first shape and fill with color
shape1 = ppt.Slides[0].Shapes.AppendShape(
    ShapeType.RoundCornerRectangle,
    RectangleF.FromLTRB(150, 150, 300, 300))
shape1.Fill.FillType = FillFormatType.Solid
shape1.Fill.SolidColor.KnownColor = KnownColors.SkyBlue

# Initialize 3D effect for shape1 and set properties
effect1 = shape1.ThreeD.ShapeThreeD
effect1.PresetMaterial = PresetMaterialType.Powder  # Material type
effect1.TopBevel.PresetType = BevelPresetType.ArtDeco  # Bevel type
effect1.TopBevel.Height = 4  # Bevel height
effect1.TopBevel.Width = 12  # Bevel width
effect1.BevelColorMode = BevelColorType.Contour  # Bevel color mode
effect1.ContourColor.KnownColor = KnownColors.LightBlue  # Contour color
effect1.ContourWidth = 3.5  # Contour width

# Add the second shape
shape2 = ppt.Slides[0].Shapes.AppendShape(
    ShapeType.Pentagon,
    RectangleF.FromLTRB(400, 150, 550, 300))
shape2.Fill.FillType = FillFormatType.Solid
shape2.Fill.SolidColor.KnownColor = KnownColors.LightGreen

# Apply different 3D effects to shape2
effect2 = shape2.ThreeD.ShapeThreeD
effect2.PresetMaterial = PresetMaterialType.SoftEdge
effect2.TopBevel.PresetType = BevelPresetType.SoftRound
effect2.TopBevel.Height = 12
effect2.TopBevel.Width = 12
effect2.BevelColorMode = BevelColorType.Contour
effect2.ContourColor.KnownColor = KnownColors.LawnGreen
effect2.ContourWidth = 5

# Save the document
ppt.SaveToFile("Set3DEffectForShape_out.pptx", FileFormat.Pptx2013)
ppt.Dispose()
Result Preview:
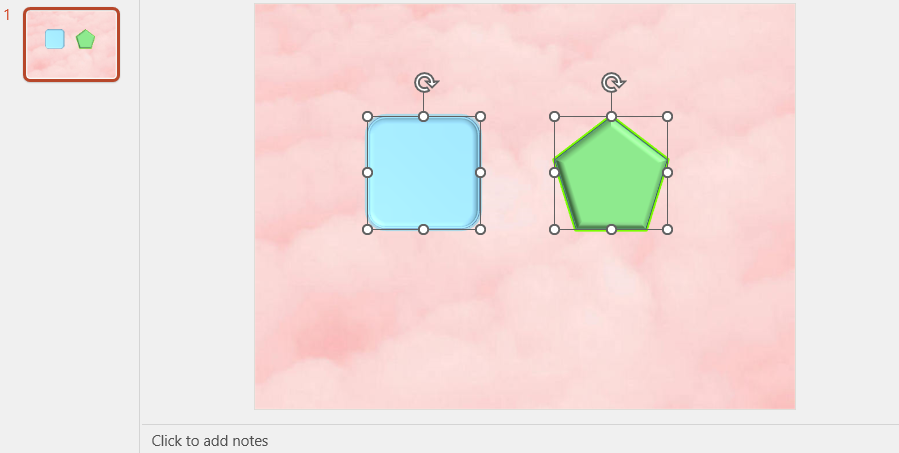
Main 3D effect properties include:
PresetMaterial: Preset material types such as powder, soft edge, metal, etc.
TopBevel: Type, height, and width of the top bevel
BevelColorMode: Bevel color mode
ContourColor/ContourWidth: Contour color and width
Ungrouping Shapes
When you need to edit individual shapes within a group separately, you can ungroup them first:
from spire.presentation import *

# Load a document containing grouped shapes
ppt = Presentation()
ppt.LoadFromFile("GroupShapes.pptx")

# Get the grouped shape
groupShape = ppt.Slides[0].Shapes[0] if isinstance(ppt.Slides[0].Shapes[0], GroupShape) else None

# Ungroup the shape
ppt.Slides[0].Ungroup(groupShape)

# Save the document
ppt.SaveToFile("UngroupShapes.pptx", FileFormat.Pptx2013)
ppt.Dispose()
After ungrouping, the original child shapes are restored as independent objects and can be edited individually.
Applying Shadow Effects
In addition to 3D effects, shadows are another commonly used decorative effect for shapes:
from spire.presentation import *

# Create a presentation
ppt = Presentation()

# Add a shape
shape = ppt.Slides[0].Shapes.AppendShape(
    ShapeType.Rectangle,
    RectangleF.FromLTRB(100, 100, 300, 200))
shape.Fill.FillType = FillFormatType.Solid
shape.Fill.SolidColor.KnownColor = KnownColors.LightBlue

# Set shadow effect
shadow = shape.Effect.D presetShadow
shadow.BlurRadius = 10  # Blur radius
shadow.Distance = 5  # Shadow distance
shadow.Direction = 45  # Shadow direction (angle)
shadow.ColorFormat.Color = Color.get_Gray()  # Shadow color

# Save the document
ppt.SaveToFile("SetShadowEffectForShape.pptx", FileFormat.Pptx2013)
ppt.Dispose()
Additional Shape Formatting Options
Gradient Fill
from spire.presentation import *

# Create a shape
shape = ppt.Slides[0].Shapes.AppendShape(
    ShapeType.Ellipse,
    RectangleF.FromLTRB(100, 100, 300, 300))

# Set gradient fill
shape.Fill.FillType = FillFormatType.Gradient
shape.Fill.Gradient.GradientStops.Add(0, Color.get_Blue())
shape.Fill.Gradient.GradientStops.Add(1, Color.get_White())
shape.Fill.Gradient.GradientType = GradientStyleType.Horizontal

# Save the document
ppt.SaveToFile("FillShapeWithGradient.pptx", FileFormat.Pptx2013)
ppt.Dispose()
Pattern Fill
# Set pattern fill
shape.Fill.FillType = FillFormatType.Pattern
shape.Fill.Pattern.PatternType = PatternFillType.DiagonalBrick
shape.Fill.Pattern.ForeColor = Color.get_Red()
shape.Fill.Pattern.BackColor = Color.get_Yellow()
Picture Fill
# Fill shape with an image
shape.Fill.FillType = FillFormatType.Picture
shape.Fill.PictureFill.Picture.Url = "texture.jpg"
shape.Fill.PictureFill.FillType = PictureFillType.Stretch
Practical Tips
Batch Grouping Similar Shapes
When you need to group multiple shapes of the same type, you can simplify the code using loops:
# Collect all rectangle shapes
rectangles = []
for shape in slide.Shapes:
    if shape.ShapeType == ShapeType.Rectangle:
        rectangles.append(shape)

# If multiple rectangles are found, group them
if len(rectangles) > 1:
    slide.GroupShapes(rectangles)
Finding and Replacing Shapes Within Groups
You can identify and locate specific shapes using alternative text (Alt Text):
# Set alternative text for a shape
shape.AlternativeText = "MyCustomShape"

# Find shapes by alternative text
for shape in slide.Shapes:
    if shape.AlternativeText == "MyCustomShape":
        # Perform operations
        shape.Fill.SolidColor.KnownColor = KnownColors.Red
Protecting Shapes from Modification
You can lock shapes to prevent accidental modifications:
# Prevent shape modification
shape.Locking.SelectionProtection = True
shape.Locking.PositionProtection = True
shape.Locking.SizeProtection = True
Summary
This article has introduced various methods for performing advanced shape operations in PowerPoint using Python, including:
Grouping multiple shapes into a single object
Applying 3D effects to shapes (materials, bevels, contours)
Ungrouping shapes for individual editing
Adding shadow effects to enhance visual hierarchy
Filling shapes with gradients, patterns, and images
Managing and locating shapes through alternative text
These techniques can help create more professional and engaging presentations, especially for scenarios requiring complex graphic design. Through programmatic processing, you can also batch-generate standardized graphical elements, improving workflow efficiency.


